
Weekend Warriors: Home Reno Edition
We bought our home 3 years ago, and it needed some modernizing. It was built in 1984, and much of it was renovated in the early ‘90’s, but has not really been touched since. All of the big ticket items (kitchen, bathrooms) “need” cosmetic overhauls, but are perfectly functional as is. Having said all of that, there are other things we have wanted, and still want, to do that are much more cost effective!

 |
 |
We did some research and found a few methods to painting tile, but the consensus seemed to be that we needed to clean it with Krud Kutter Gloss Off and then use Kilz Adhesion Primer. It was as simple as cleaning the tile using the gloss off and a soft rag then waiting ten minutes before painting with the Kilz. We chose a neutral black and white palate—the colors were actually a super light gray, and a super dark gray-ish/black, but I wanted a classic look.
I knew the look of the mantle I was wanting and surprisingly, it came from Amazon. We found it, ordered it, it arrived quickly, and was just what we were looking for! It is The Pearl Mantel Company Shenandoah 72-Inch Shelf/Mantel Shelf Dune Rustic Distressed Finish . (I had looked at other options, and found that others were really expensive and/or the shipping would have been almost as much as the mantle. I would have loved to have been able to find an old, reclaimed piece of wood to use, but again, they were pricey.) The install of the new mantel took less than 30 minutes, and it came with the cleat that you can see Richard installing in the pictures below. It did not come with mounting hardware, but luckily Richard knew what was needed. He ordered a box of masonry sleeve anchors and a new 3/8" masonry hammer drill bit.
This installation video from the manufacturer actually came in pretty handy as a reference on how to start and make sure it was centered and level.

|
 |
 |
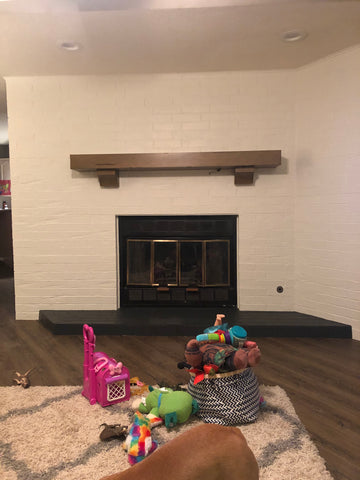 |
The entire process was finished in one weekend and made a huge impact in our den!
Total budget: $500
What we spent in total:
Mantel $298
Primer/Paint:$105
Mounting Hardware $21.00
For a grand total of $424.00
A few other small projects we hope to work on in the next year include: our entryway closet, turning a desk nook into a pantry, updating the wet bar in the den, and a laundry room overhaul (this one will be a bit more involved). Our next project, however, will be updating our daughter’s room—it’s what she asked us for, for her birthday. When we moved into our house she was 5 years old, and now is almost 8, so she wants a more “grown up” space. Our current 5 year old is going to get her older sister’s bedding and would like her walls painted, also. Stay tuned for those transformations!